
Bluetooth
Colour Lamp
A colour lamp using an Arduino Uno creates smooth, colorful lighting effects using an RGB LED. The lamp can cycle through colors gradually or allow users to select colors using potentiometers, push buttons, or a remote control (optional). This project is great for decorative lighting, ambient room lighting, or relaxation purposes.
How It Works
The Colour lamp operates in two modes: automatic colour cycling and manual colour control. It uses an RGB LED to smoothly transition between colours or allows the user to adjust them manually using potentiometers.
Materials
To build a colour lamp project with an Arduino Uno, you'll need the following materials:
Components:
1) Arduino Uno
-
Controls the RGB LED and color transitions.
2) Common Anode RGB LED
-
Provides adjustable colored lighting.
3) 220Ω Resistors (3x)
-
Limits current to each LED color channel.
4) 10kΩ Resistors (2x)
-
Pull-down resistors for push buttons to ensure stable readings.
5) Potentiometers (3x 10kΩ) or Push Buttons
-
Used for manual color control.
6) Push Buttons (2x)
-
Mode change and power toggle.
7) Bluetooth Module (HC-05 or HC-06)
-
Enables wireless control.
8) Breadboard & Jumper Wires
-
For wiring connections.
9) USB Cable (Type-A to Type-B)
-
To connect Arduino to a computer for programming and power.
Basic Setup


1) RGB LED (Common Anode)
-
RGB Anode → 5V
-
Red (R) → Pin 9 (via 220Ω resistor)
-
Green (G) → Pin 10 (via 220Ω resistor)
-
Blue (B) → Pin 11 (via 220Ω resistor)
2) Potentiometers (For Manual Colour Control)
-
Pot 1 (Red Control)
-
VCC → 5V
-
GND → GND
-
Output → A0
-
-
Pot 2 (Green Control)
-
VCC → 5V
-
GND → GND
-
Output → A1
-
-
Pot 3 (Blue Control)
-
VCC → 5V
-
GND → GND
-
Output → A2
-
3) Button 1 (On/Off)
-
Connect one side to Pin 3 on the Arduino.
-
Connect the other side to 5V.
-
Connect a 10kΩ pull-down resistor between Pin 3 and GND.
4) Button 2 (Mode Change)
-
Connect one side to Pin 2 on the Arduino.
-
Connect the other side to 5V.
-
Connect a 10kΩ pull-down resistor between Pin 2 and GND.
5) Bluetooth receiver (HC-06)
-
VCC → 5V
-
GND → GND
-
TXD → Pin 6
-
RXD → Pin 7 (via 1kΩ & 2kΩ voltage divider)
Software Setup
1) SoftwareSerial.h library
-
The SoftwareSerial library is built into the Arduino IDE, so you don’t need to install anything manually. You can include and use it directly in your code.
2) Serial Bluetooth Terminal App
This app allows you to send serial communication to the Arduino via a Bluetooth module.
-
Installation
-
For Android, download the "Serial Bluetooth Terminal" App by Kai Morich
-
For Apple, download the "Bluetooth Terminal" App by Lukas Pistrol
-
-
Pair your Module
-
Power on the Bluetooth module (HC-05/HC-06) with Arduino.
-
Open the Serial Bluetooth Terminal app (or another Bluetooth terminal app).
-
In the app, select the HC-05/HC-06 module from the list of available devices.
-
Tap "Connect" inside the app.
-
Once connected, you can send and receive commands.
-
-
Set up buttons for easy command sending
-
In the App, create shortcut buttons to send commands to the terminal, eg. a button called "Blue" that will send "Blue" to the terminal.
-

CODE BREAK-DOWN
#include <SoftwareSerial.h>;
-
Includes the SoftwareSerial library, which allows the Arduino to use other digital pins for serial communication (used for Bluetooth here).
#define RED_PIN 9;
#define GREEN_PIN 10;
#define BLUE_PIN 11;
-
Assigns pin numbers for the red, green, and blue channels of the RGB LED.
#define MODE_BUTTON 2;
#define POWER_BUTTON 3;
-
Assigns pin numbers for the mode switch and power switch push buttons.
#define POT_RED A0;
#define POT_GREEN A1;
#define POT_BLUE A2;
-
Assigns analog pins to the potentiometers that manually control the red, green, and blue colours.
bool mode = false;
-
Declares a boolean variable to keep track of the mode — auto cycle or manual.
bool lampOn = true;
-
Declares a boolean to track whether the lamp is currently on or off.
SoftwareSerial BTSerial(6, 7);
-
Sets up software serial on pins 6 and 7 for Bluetooth communication using the HC-06 module.
void setup();
-
Begins the setup function, which runs once when the Arduino is powered on.
pinMode(RED_PIN, OUTPUT);
pinMode(GREEN_PIN, OUTPUT);
pinMode(BLUE_PIN, OUTPUT);
-
Sets the RGB LED pins as outputs so they can control the LED brightness.
pinMode(MODE_BUTTON, INPUT);
pinMode(POWER_BUTTON, INPUT);
-
Sets the mode and power buttons as inputs, assuming external pull-down resistors are used.
Serial.begin(9600);
BTSerial.begin(9600);
-
Starts serial communication on both the standard and Bluetooth serial ports at 9600 baud.
Serial.println("Bluetooth Mood Lamp Ready");
-
Prints a message to the Serial Monitor for confirmation that the program is running.
void loop();
-
Begins the main loop that runs repeatedly.
if (digitalRead(POWER_BUTTON) == HIGH);
-
Checks if the power button was pressed.
lampOn = !lampOn;
-
Toggles the lamp's on/off state.
Serial.println(lampOn ? "Lamp ON" : "Lamp OFF");
BTSerial.println(lampOn ? "Lamp ON" : "Lamp OFF");
-
Sends a message to the serial monitor and over Bluetooth about the lamp’s state.
delay(300);
-
Adds a short delay to debounce the button press.
if (digitalRead(MODE_BUTTON) == HIGH);
-
Checks if the mode button was pressed.
mode = !mode;
-
Toggles between auto cycle mode and manual control mode.
Serial.println(mode ? "Manual Mode" : "Auto Mode");
BTSerial.println(mode ? "Manual Mode" : "Auto Mode");
-
Sends the current mode to the serial monitor and Bluetooth.
delay(300);
-
Debounce delay for the mode button.
if (BTSerial.available());
-
Checks if there’s any incoming data from the Bluetooth module.
char command = BTSerial.read();
-
Reads the incoming character from Bluetooth.
handleBluetoothCommand(command);
-
Passes the received character to a function that handles different Bluetooth commands.
if (lampOn);
-
Checks if the lamp is supposed to be on.
if (mode);
-
If in manual mode…
manualControl();
-
Call the function that reads the potentiometers and sets the RGB LED.
else;
-
If in auto cycle mode…
colorCycle();
-
Call the function that automatically cycles through colours.
else;
-
If the lamp is off…
setRGB(0, 0, 0);
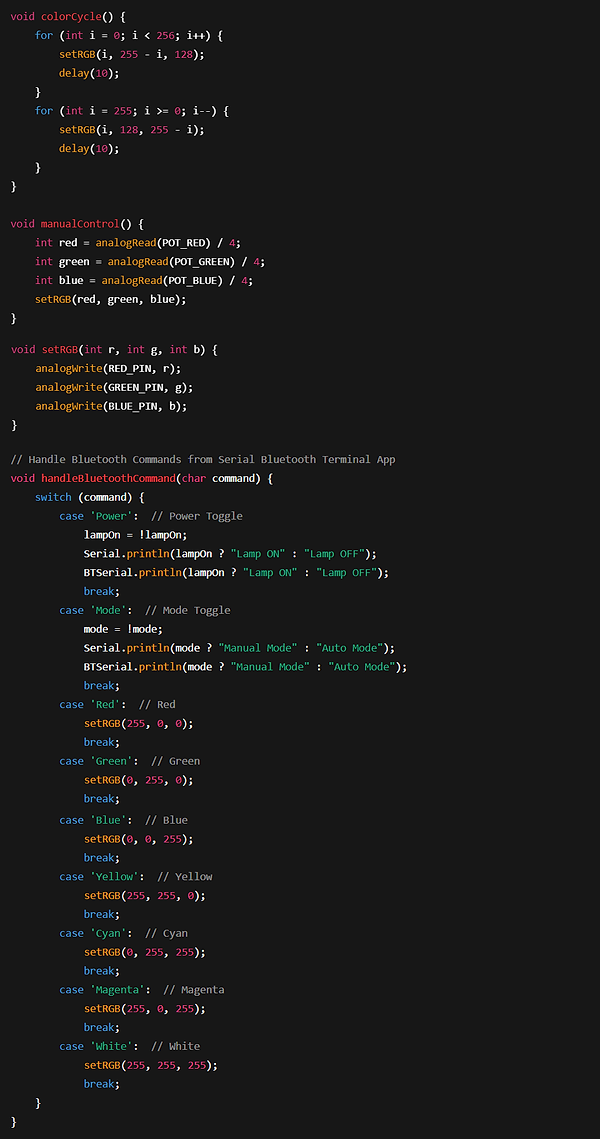
void colorCycle();
-
Starts the function that cycles through colours automatically.
for (int i = 0; i < 256; i++);
-
Gradually increases the red and decreases the green from 0 to 255.
setRGB(i, 255 - i, 128);
-
Updates the LED to a mix of red and green with fixed blue.
delay(10);
-
Small delay to slow down the transition.
for (int i = 255; i >= 0; i--);
-
Then fades the red out and blue in.
setRGB(i, 128, 255 - i);
-
Changes the colours again with fixed green.
delay(10);
-
Small delay for the second transition.
void manualControl();
-
Starts the function that reads potentiometers for manual control.
int red = analogRead(POT_RED) / 4;
-
Reads and scales the red potentiometer value (0–1023 to 0–255).
int green = analogRead(POT_GREEN) / 4;
-
Reads and scales the green potentiometer.
int blue = analogRead(POT_BLUE) / 4;
-
Reads and scales the blue potentiometer.
setRGB(red, green, blue);
-
Sets the RGB LED using the potentiometer values.
void setRGB(int r, int g, int b);
-
Starts a function to set the brightness of each RGB channel.
analogWrite(RED_PIN, r);
-
Sends PWM signal to red LED.
analogWrite(GREEN_PIN, g);
-
Sends PWM signal to green LED.
analogWrite(BLUE_PIN, b);
-
Sends PWM signal to blue LED.
void handleBluetoothCommand(char command);
-
Starts a function to handle commands from the Bluetooth terminal.
switch (command);
-
Begins checking which command was received.
case 'Power':
lampOn = !lampOn;
Serial.println(lampOn ? "Lamp ON" : "Lamp OFF");
BTSerial.println(lampOn ? "Lamp ON" : "Lamp OFF");
-
Toggles the lamp and reports status.
break;
case 'Mode':
mode = !mode;
Serial.println(mode ? "Manual Mode" : "Auto Mode");
BTSerial.println(mode ? "Manual Mode" : "Auto Mode");
-
Toggles the mode and reports it.
break;
case 'Red':
setRGB(255, 0, 0);
-
Sets the lamp to red.
break;
case 'Green':
setRGB(0, 255, 0);
-
Sets the lamp to green.
break;
case 'Blue':
setRGB(0, 0, 255);
-
Sets the lamp to blue.
break;
case 'Yellow':
setRGB(255, 255, 0);
-
Sets the lamp to yellow.
break;
case 'Cyan':
setRGB(0, 255, 255);
-
Sets the lamp to cyan.
break;
case 'Magenta':
setRGB(255, 0, 255);
-
Sets the lamp to magenta.
break;
case 'White':
setRGB(255, 255, 255);
-
Sets the lamp to white.
break;