
Animate LCD

Animating a 16x2 LCD Shield using an Arduino Uno is a straightforward task that leverages the LiquidCrystal library for text manipulation and visual effects. By combining scrolling, blinking, and custom character animations, you can make your Arduino projects more engaging and visually appealing. In this project we will be wiring the LCD Shield to the Arduino to allow for other pins to be used for more sensors and modules if need be.
Materials

To animate a 16x2 LCD with an Arduino Uno, you'll need the following materials:
Components:
1) Arduino Uno (or any compatible Arduino board)
-
The microcontroller used to control the LCD and create animations.
2) 16x2 LCD Screen
-
Displays the measured distance.
-
Can have button module or standard 16x2 stand-alone display
-
If using the stand-alone 16x2 LCD, a 220Ω resistor will be needed for pin 15 to Power (+) of the Arduino
-
3) Jumper Wires
-
Used to connect the Arduino to the LCD
4) USB Cable
-
To connect the Arduino to your computer for programming and power.
Basic Setup

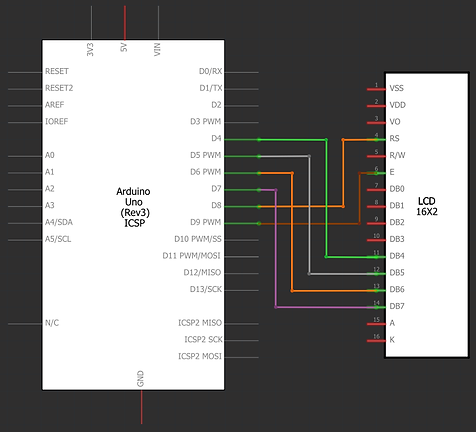
IF USING THE 16x2 SHIELD, WIRE IT AS FOLLOWS
OR JUST PLUG IT INTO THE ARDUINO
1) Connect the LCD to the Arduino:
-
The LCD Shield has a 5V pin and a GND pin (Located Right of the buttons) these must be connected to the Arduinos 5V and GND pin respectively.
-
The LCD has 16 pins. Wire them as follows:
-
Pin 1 (VSS): (GND '-') Leave unconnected, this is pre-routed via the Shields' board.
-
Pin 2 (VDD): (5V '+') Leave unconnected, this is pre-routed via the Shields' board.
-
Pin 3 (V0): (GND '+') Leave unconnected, this is pre-routed via the Shields' board.
-
Pin 4 (RS): Connect to Arduino digital Pin 8.
-
Pin 5 (RW): (GND '+') Leave unconnected, this is pre-routed via the Shields' board.
-
Pin 6 (E): Connect to Arduino digital Pin 9.
-
Pins 7-10 (D0-D3): Leave unconnected (for 4-bit mode).
-
Pins 11-14 (D4-D7): Connect to Arduino digital Pins 4, 5, 6, and 7 respectively.
-
Pin 15 (Backlight +): (5V '+') Leave unconnected, this is pre-routed via the Shields' board.
-
Pin 16 (Backlight -): (GND '-') Connect to common Arduino GND.
-
IF USING THE 16x2 STAND-ALONE LCD DISPLAY
NOT USED IN THIS TUTORIAL
-
The LCD has 16 pins. Wire them as follows:
-
Pin 1 (VSS): (GND '-') Connect to Arduino's common ground pin.
-
Pin 2 (VDD): (5V '+') Connect to the 5V line of the Arduino.
-
Pin 3 (V0): (GND '+') Connect to the 5V line of the Arduino.
-
Pin 4 (RS): Connect to Arduino digital Pin 8.
-
Pin 5 (RW): (GND '-') This pin dictates if the LCD will read/write. Connect to Arduino's common ground pin for write mode.
-
Pin 6 (E): Connect to Arduino digital Pin 9.
-
Pins 7-10 (D0-D3): Leave unconnected (for 4-bit mode).
-
Pins 11-14 (D4-D7): Connect to Arduino digital Pins 4, 5, 6, and 7 respectively.
-
Pin 15 (Backlight +): (5V '+') Connect to the 5V line of the Arduino through a 220Ω resistor.
-
Pin 16 (Backlight -): (GND '-') Connect to Arduino's common ground pin.
-
2. Write the Sketch:
-
Open the Arduino IDE and install the LiquidCrystal library:
-
Go to Sketch → Include Library → Manage Libraries.
-
Search for "LiquidCrystal" and install the LiquidCrystal library.
-

CODE BREAK-DOWN
#include <LiquidCrystal.h>
-
Includes the LiquidCrystal library, which provides functions to control the LCD display.
LiquidCrystal lcd(8, 9, 4, 5, 6, 7);
-
Creates an instance of the LiquidCrystal object.
-
Specifies the Arduino pins connected to the LCD:
-
Pin 8 for RS (Register Select)
-
Pin 9 for Enable (E)
-
Pins 4, 5, 6, and 7 for the data lines (D4-D7)
-
void setup() {
-
Begins the setup function, which runs once when the Arduino starts.
lcd.begin(16, 2);
-
Configures the LCD with 16 columns and 2 rows to match the 16x2 LCD.
lcd.print("Hello, Arduino!");
-
Displays the text "Hello, Arduino!" on the LCD.
delay(2000);
-
Pauses the program for 2000 milliseconds (2 seconds) to let the message stay visible.
void loop() {
-
Begins the main loop, which runs repeatedly after the setup.
for (int position = 0; position < 16; position++) {
-
Starts a loop to scroll the text from right to left.
-
position iterates from 0 to 15, representing each column on the LCD.
lcd.scrollDisplayLeft();
-
Moves the entire display content one position to the left.
delay(300);
-
Pauses for 300 milliseconds to control the scrolling speed.
for (int position = 0; position < 16; position++) {
-
Starts another loop to scroll the text back from left to right.
-
position iterates from 0 to 15 again.
lcd.scrollDisplayRight();
-
Moves the entire display content one position to the right.
delay(300);
-
Pauses for 300 milliseconds to control the scrolling speed.
lcd.noDisplay();
-
Turns off the display, making the LCD appear blank.
delay(500);
-
Pauses for 500 milliseconds with the display off.
lcd.display();
-
Turns the display back on, restoring visibility of the text.
delay(500);
-
Pauses for another 500 milliseconds before restarting the loop.